
Protect your data with Two-Factor Authentication
Increase the security of your data by enabling Two-Factor Authentication (2FA). When activated, you’ll be prompted to enter an additional unique security Code after entering your Master Password each time you unlock your database.
What is Two-Factor Authentication?
Two-Factor Authentication (2FA) is the use of 2 pieces of information for authentication - each of which is from an independent source. The requirement of an additional component(s) to allow access increases security because the probability that multiple unconnected sources have been simultaneously hacked is small.
In practice, this means that your account is even safer because even if a hacker manages to get access to your Master Password, it is unlikely that they would also physically have your smartphone that you paired with 2FA.
Set-up requirements
- It is necessary to have the latest available version of Sticky Password installed on every device that is connected to your StickyAccount. Devices running an older version of Sticky Password will not be able to unlock the database that is protected by 2FA.
- Initial activation must be performed on your desktop device (Windows or Mac). Once enabled by you, 2FA will be automatically enabled on all your other Sticky Password-authorized devices (Windows, Mac, iOS and Android) the next time a sync is performed.
- It is necesary to install Google Authenticator (GA) on your mobile device in order to enable 2FA. GA is the app that will generate the Codes that will be the second factor for logging into Sticky Password. You can download it for Android and for iOS.
Important: When 2FA is enabled, an internet connection will be required each time you unlock your database.
Enabling Two-Factor Authentication
Once you’ve installed the Google Authenticator app on your Android or iOS device and have the latest available version of Sticky Password installed on each of your devices, follow these steps:
-
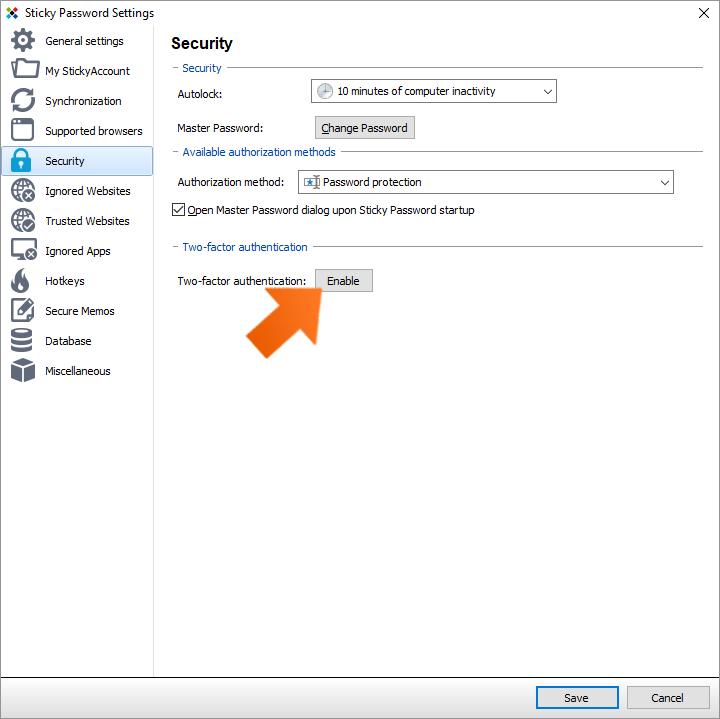
On your PC click Menu in the top right corner of the main window and select Settings.
On your Mac go to the Preferences menu. -
Click the Security tab.

-
Click Enable in the Two-Factor Authentication section.
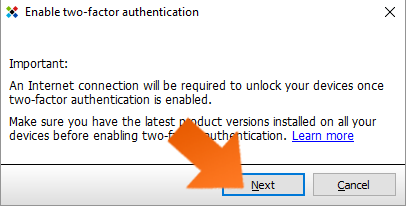
After reading the notification that when 2FA is enabled, an Internet connection will be required whenever unlocking the Sticky Password database, click Next.
-
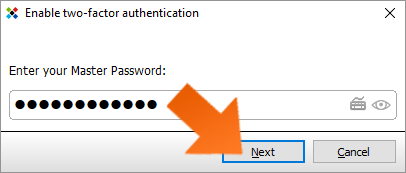
Since this involves a change to a Security setting, i.e. securely accessing Sticky Password, you will be prompted to Enter your Master Password and click Next.
-
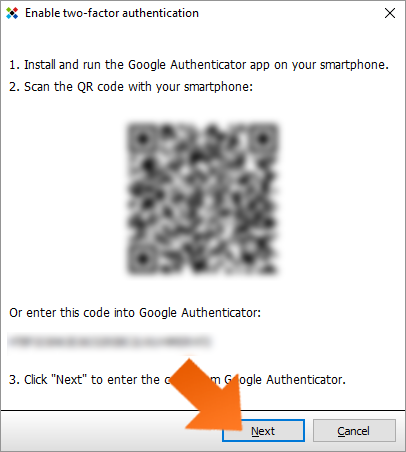
Open the Google Authenticator app on your mobile device and scan the QR code on the screen OR manually enter the alpha-numeric code below it into the Google Authenticator app. This will create a new GA entry (GA account) paired with your Sticky Password account that will begin generating 6-digit codes that change every 30 seconds. Click Next.
-
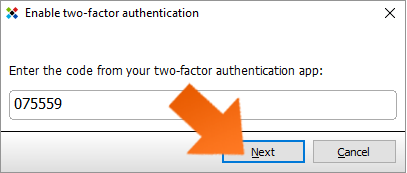
Enter the current 6-digit code from Google Authenticator when prompted by Sticky Password and click Next. This will confirm the pairing between the Google Authenticator app on your device with your Sticky Password account.
-
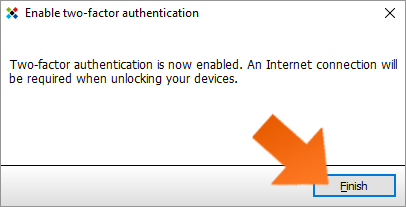
Click Finish when the screen appears confirming that 2FA has been enabled.
Unlocking Sticky Password when 2FA is enabled
-
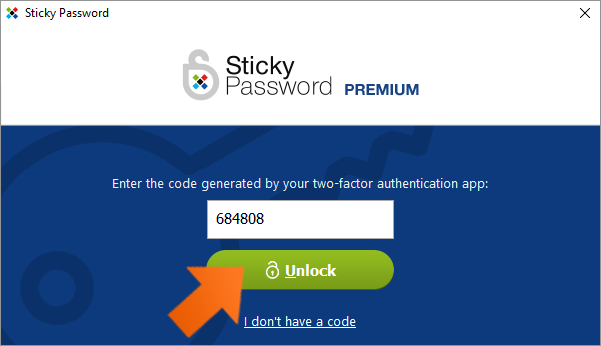
Enter your Master Password in the main login dialog as usual and click Unlock.

-
Open the Google Authenticator app on your device and enter the 6-digit code displayed in the field when prompted. Click Unlock.
What should I do if I don’t have access to the Google Authenticator app that is linked to my Sticky Password?
If, for any reason (e.g. loss or theft of your device), you don’t have access to the mobile device that has your Google Authenticator App, you are able to temporarily bypass 2FA using your e-mail (StickyID) to unlock Sticky Password in an emergency. Follow these steps:
-
Click on the “I don´t have a code” link in the unlock dialog and a special PIN will be sent to your StickyID e-mail address (or your designated Alternative e-mail address).
Important: for security reasons, this unique code will expire in 20 minutes. -
Open your inbox, copy the PIN from the e-mail we sent you and enter it in the unlock dialog. (If you can’t find the e-mail in your Inbox, please check your SPAM folder.)
If you’ve permanently lost access to the device that has your Google Authenticator app (for example, because you’ve lost it, or after upgrading to a new device), it will be necessary to disable 2FA for your StickyAccount and then to reactivate with your new device.
Disabling Two-Factor authentication
2FA can be disabled in the Settings menu in the Sticky Password application installed on your Windows computer, or under Sticky Password Preferences on your Mac.
-
On your PC select Settings.
On your Mac go to the Preferences menu. Click the Security tab.
Click Disable in the Two-Factor authentication section.
Enter your Master Password and click Next.
Enter the current 6-digit code from Google Authenticator when prompted by Sticky Password and click Next.
2FA is now disabled. Click Finish.
Note: Using 2FA on multiple devices? After you’ve disabled 2FA on your Windows/Mac, you’ll need to confirm that you are disabling 2FA on your other devices. The next time you log in to Sticky Password on each device, we’ll send you an email with a special PIN code that you’ll need to enter.
Note: After disabling 2FA in Sticky Password, it is not necessary to uninstall the Google Authenticator app on your phone.
Re-enabling 2FA
The Google Authenticator app will create a new GA entry (GA Account) for Sticky Password that will:
On Android devices - override the previous one
On iOS devices - add a new one. To avoid confusion, we recommend deleting the previous entry AFTER disabling 2FA for your Sticky Password account, and BEFORE re-enabling 2FA.
How can we improve the answer?
Send feedbackThank you!
Thank you! We will do our best to make this answer better.
An error has occurred. We apologize for the inconvenience. Please try again.