
Secure password sharing
Sticky Password allows you to securely share logins and passwords. This is a convenient and safe way to provide access to your Web Accounts in a family or business setting when more than one person needs access to the same account.
Sharing passwords using Sticky Password takes advantage of encryption and all the security features of Sticky Password. Other methods are less secure and are much harder to manage.
Sending passwords via text messages or email isn’t a best practice because plain text can be intercepted, or easily found in your messages, inbox or sent folder. Passwords written on a piece of paper are hard to keep track of, are easily lost, and aren’t secure when left on desktops, pinned to bulletin boards or taped to monitors.
And sending passwords over instant messaging apps (or social media) isn’t a good idea because the plain text transmissions may not be encrypted. Not to mention the problem that many of us stay logged in on browsers and other apps, which leaves the history open for anyone to see. And then there are the easy-to-remember bad passwords that everyone can easily figure out – including the bad guys!
Sharing via Sticky Password gives you the peace of mind that your strong and unique passwords get to the intended recipient(s) and only to the intended recipient(s), and with the access rights that you choose.
How to share passwords
Sharing logins and passwords is easy with Sticky Password. From your desktop device (Win, Mac) you can share an individual account (login and associated password), or several accounts, at a time with one or multiple recipients. When sharing with active Sticky Password users, you’ll need their StickyID (i.e. the e-mail address they used when creating their StickyAccount during the first installation of Sticky Password).
In order to share passwords – the sender and also the recipient(s), all parties involved will need to have Sticky Password Premium installed on their device(s). Of course, if the intended recipient(s) doesn’t have Sticky Password on his or her device, they’ll receive a link and instructions on how to install the app.
Sending a password (i.e. sending an invitation to share a password) can be done from your desktop or notebook (Windows and Mac).
Receiving a password (i.e. accepting or rejecting an invitation to share a password) can be done from any of your devices (Windows, Mac, Android, iOS).
Sharing using the Sharing Center
-
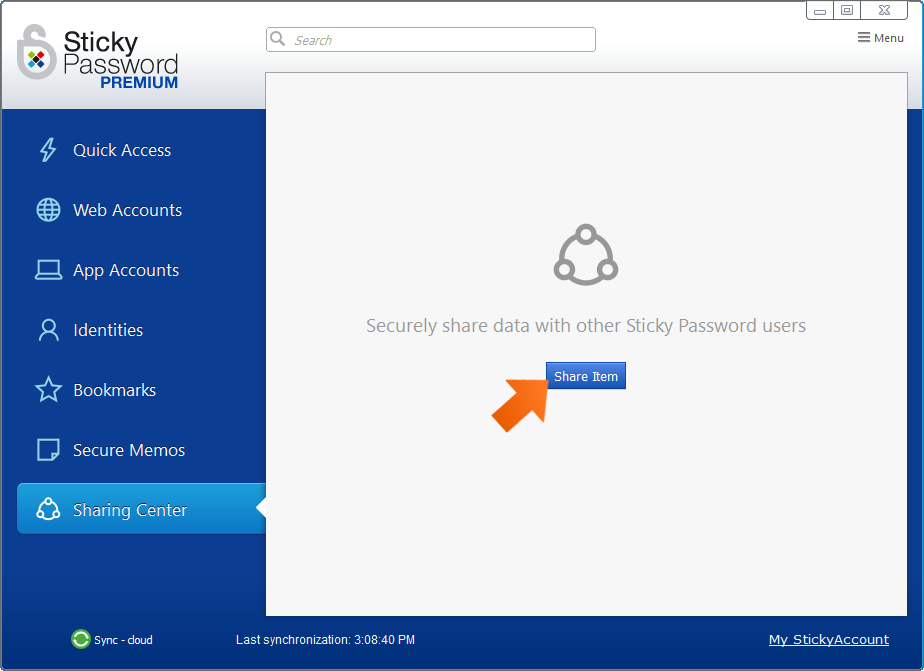
To share your first item (login and associated password), go to the Sharing Center and click Share Item. The Sharing Center can be found in the main menu on the left side of the main Sticky Password screen on your Windows or Mac computer.
-
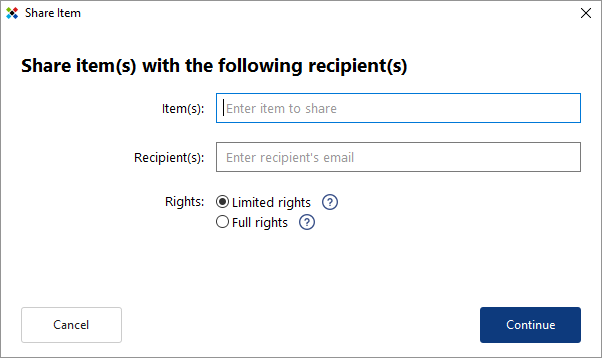
The Share Item wizard will appear.
-
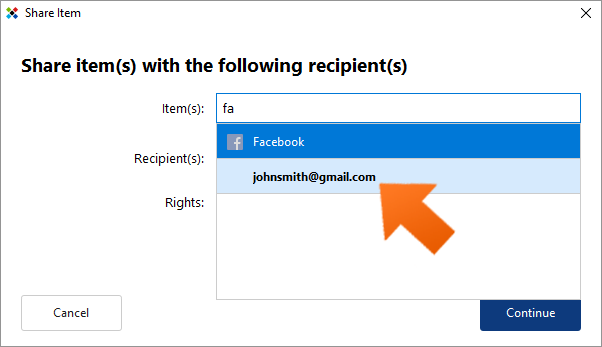
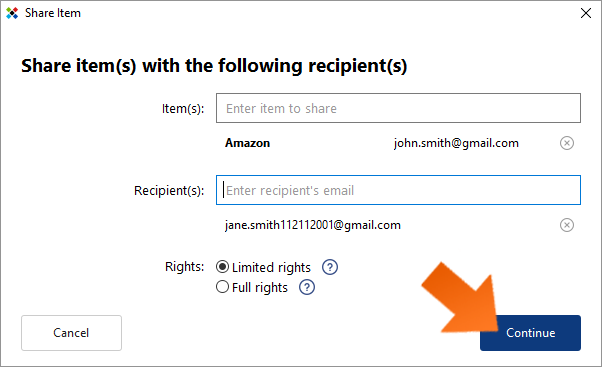
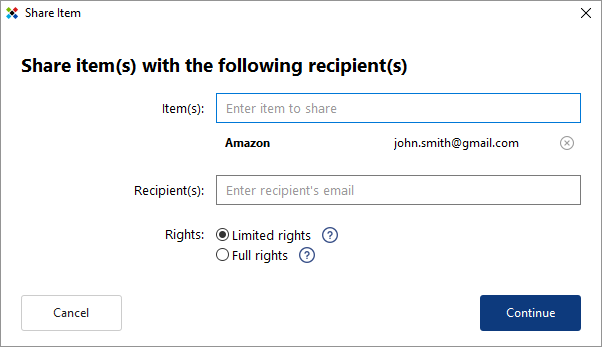
To select an item (login and associated password) to share, simply start typing the name of the account in the Item(s) field. As you type, accounts that contain the same character string will appear along with their respective logins.
- To share all logins associated with an account, click the account name.
- To share a single login, click the login of the account you want to share.
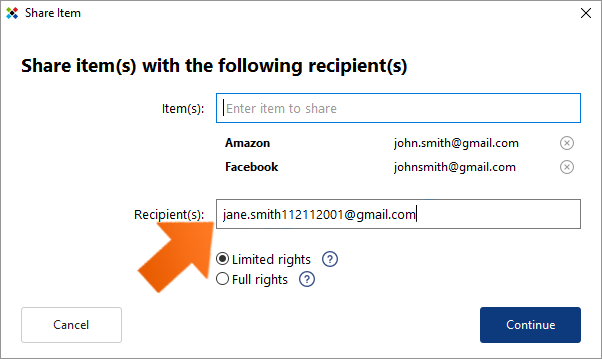
Sticky Password allows you to share multiple items with the same individual(s) at one time. Enter the items you would like to share and then continue to the Recipient(s) field. To remove any item from the list, click the (x) to the right of the item.
-
To enter a recipient, enter the email address of the person with whom you want to share the Item(s). When sharing with multiple recipients, hit Enter after entering each email address. To remove any item from the list, click the (x) to the right of the item.
Important note: When sharing with active Sticky Password users, you’ll need their StickyID (i.e. that’s the e-mail address they used when creating their StickyAccount during the first installation of Sticky Password).
-
Setting access rights. When sharing a password, you’ll also need to set the permission settings that you want each of the recipients to have. Please note that when sharing one or more Items with multiple recipients at a time, ALL recipients will have the same rights to ALL items!
- Limited rights — users with limited rights are not able to edit the item, share it with others or revoke access to the item.
- Full rights — users with full rights have the same access rights to the item as you. They are able to edit, share and revoke access to the item. Note: This means that they are also able to revoke your access.
The default setting is Limited rights. To change the setting, click the radio button next to Full rights. Click Continue.
-
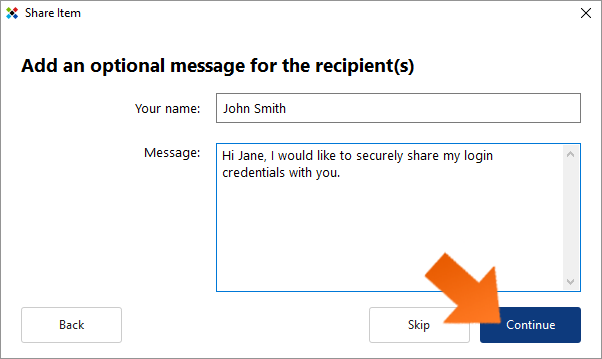
Adding an optional personal message. Clicking Continue will open the optional message dialog. If you would like to include a message to the intended recipient(s) as part of the sharing invitation, enter your name and a message.
Click Skip if you do not wish to include a message. Otherwise, enter a message for the recipient (such as instructions you would like them to follow, or maybe a reminder of why you are sharing the login) and click Continue to share your invitation(s).
-
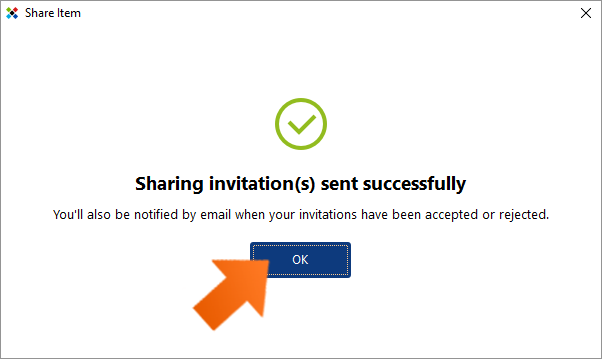
Done! A message will pop up letting you know that your invitation(s) have been sent successfully. All recipients will now receive an email message from Sticky Password with an invitation to start sharing a password with you.
If they have Sticky Password already installed and you used their proper StickyID (i.e. that’s the e-mail address they used when creating their StickyAccount during the first installation of Sticky Password), each will also see a pending invitation in their respective Sticky Password Sharing Center. Now it’s up to them to accept or reject your invitation. You, as the sender, will receive a notification by email when each of your invitations has been accepted or rejected.
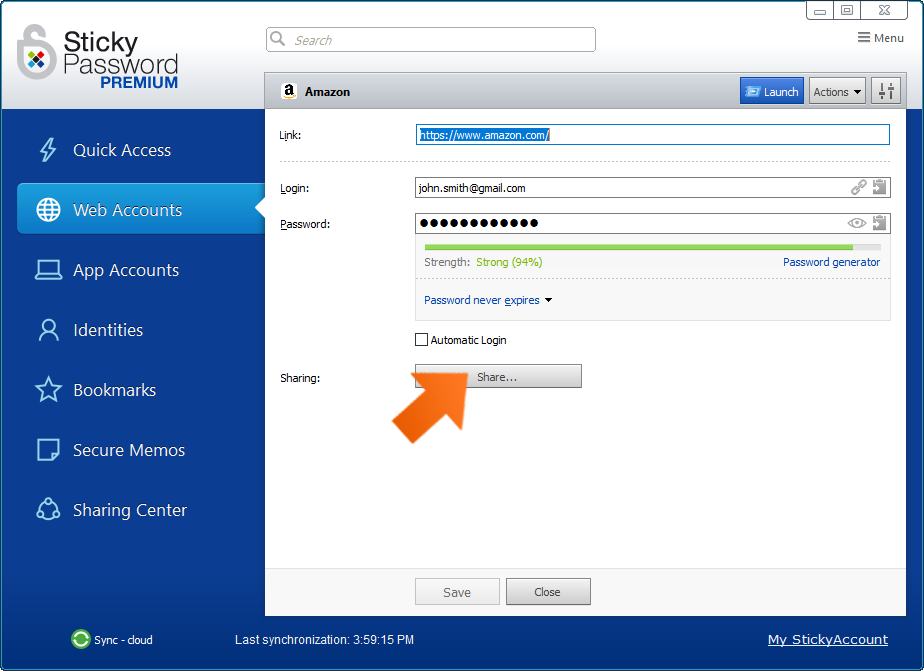
Sharing directly from a Web Account
-
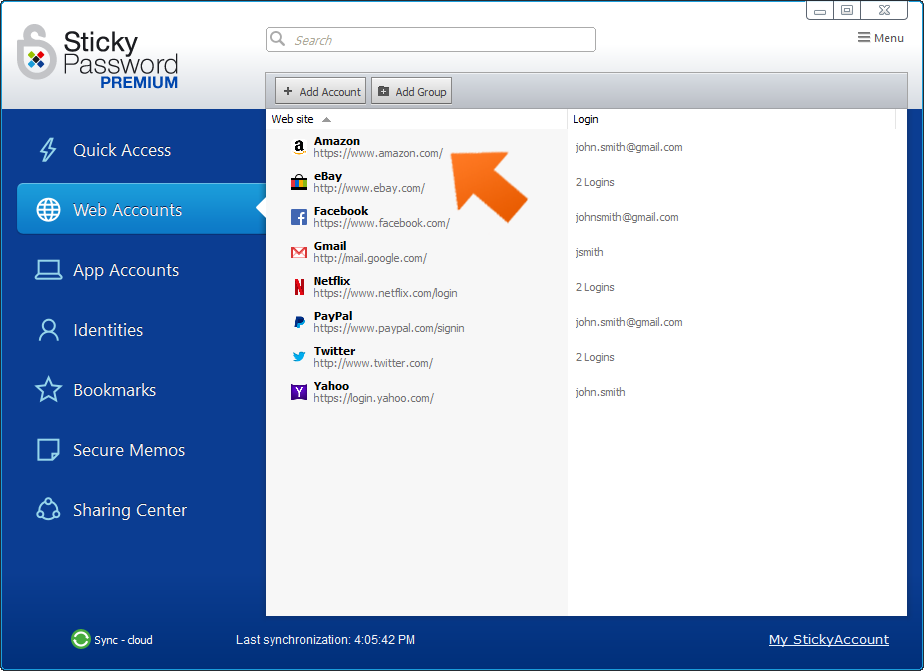
In the main Sticky Password window, go to Web Accounts and select the account you would like to share. Double click on the account and choose the login that you would like to share.
-
Click the Share button to launch the Share Item wizard.
-
The selected account will be prefilled in the Share Item wizard and you can continue with step 4. above.
Managing shared passwords via the Sharing Center
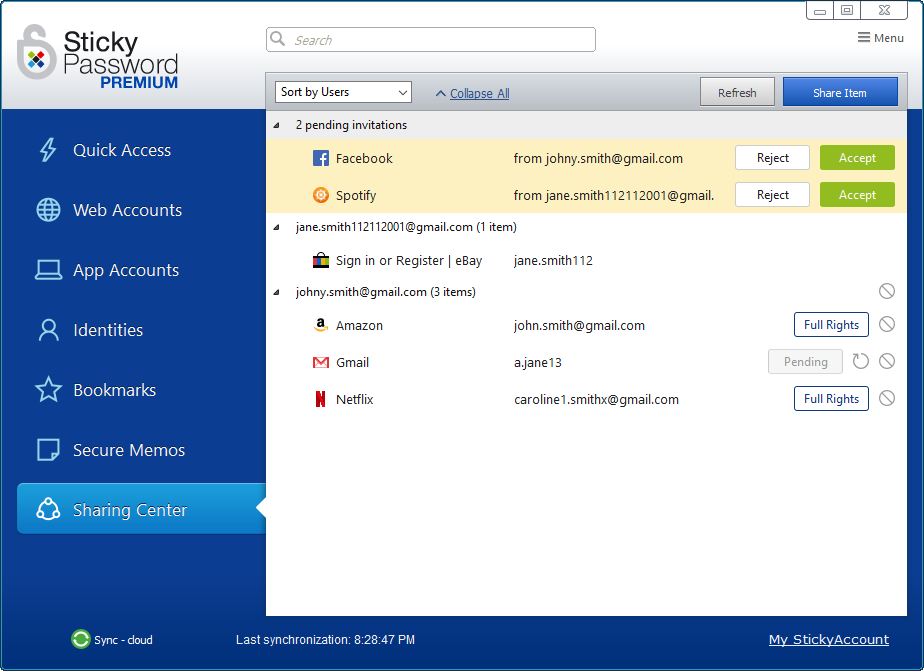
Items you have shared with others, as well as items that have been shared with you, appear in the Sharing Center. Here you are able to perform all sharing-related actions based on the rights you have to each item.
Pending invitations
You’ll see all the invitations you have sent, as well as those that have you received, that are pending in the Sharing Center.
-
Pending invitations that you have sent and are awaiting a response from the recipient — these are listed alphabetically in the list of shared items and are labeled as Pending on the right side. To send a reminder to the recipient, click the resend arrow icon. Resending can only be done on your desktop or notebook (Windows, Mac).
-
Pending invitations that you received and are awaiting your response — these are easily identifiable because they are listed at the top of the list and have a yellow background to draw your attention. Click Accept to begin sharing. Click Reject to decline. Accepting and rejecting a pending invitation can be performed on all your devices – desktop, notebook, smartphone, tablet (Windows, Mac, Android, iOS). Email notification of your acceptance/rejection will be sent to the person who invited you to share a password.
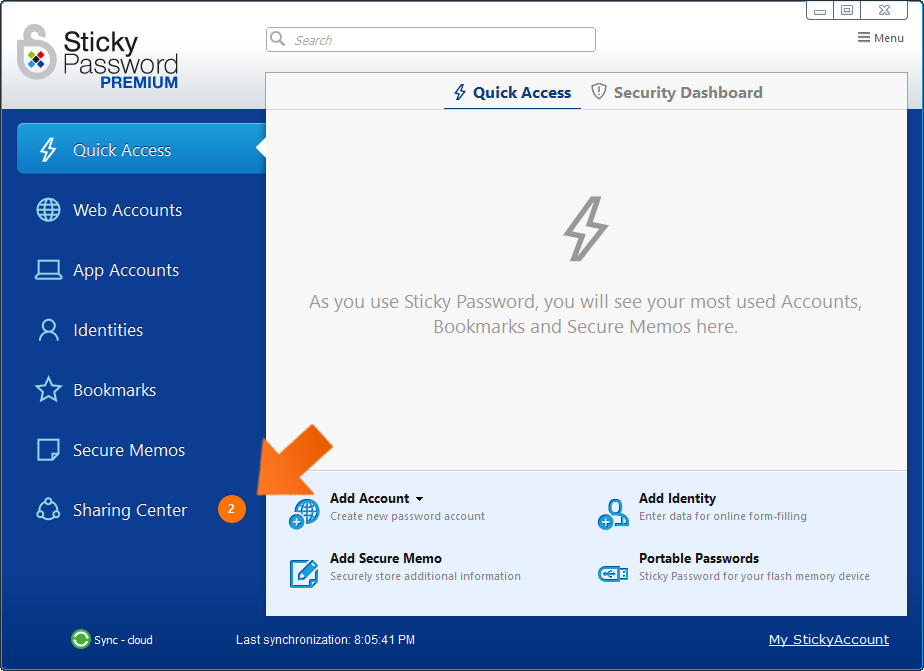
You’ll also see the number of pending invitations that have been sent to you and are awaiting your response in the Sharing Center tab.
Overview - sorting the list
In the list of shared accounts in the Sharing Center, you can choose between two types of views.Your shared items can be listed alphabetically by item (account name with corresponding login) or by user name with whom items have been shared. Click in the Sort by field to choose between:
- Sort by Users — sorted by user name — displays a list of everyone with whom you share an account, and a sub-listing of all the accounts shared with each user.
- Sort by Items — sorted by account name — displays a list of all accounts you share, and a sub-listing of the user names of the individuals with whom each account is shared.
Changing the access rights of other users
There are two levels of access rights for shared items:
- Limited rights — Users with limited rights are not able to edit the item, share it with others or revoke access to the item.
- Full rights — Users with full rights have the same access rights to the item as you. They are able to edit, share and revoke access to the item. Note: This means that they are also able to revoke your access.
In order to change the access rights of another user to a shared account, it is necessary for you to have full rights to that particular account. If you have full rights, then the items of the individuals with whom the item is shared will be shown with their respective rights displayed on the right side (with the labels Full rights or Limited rights).
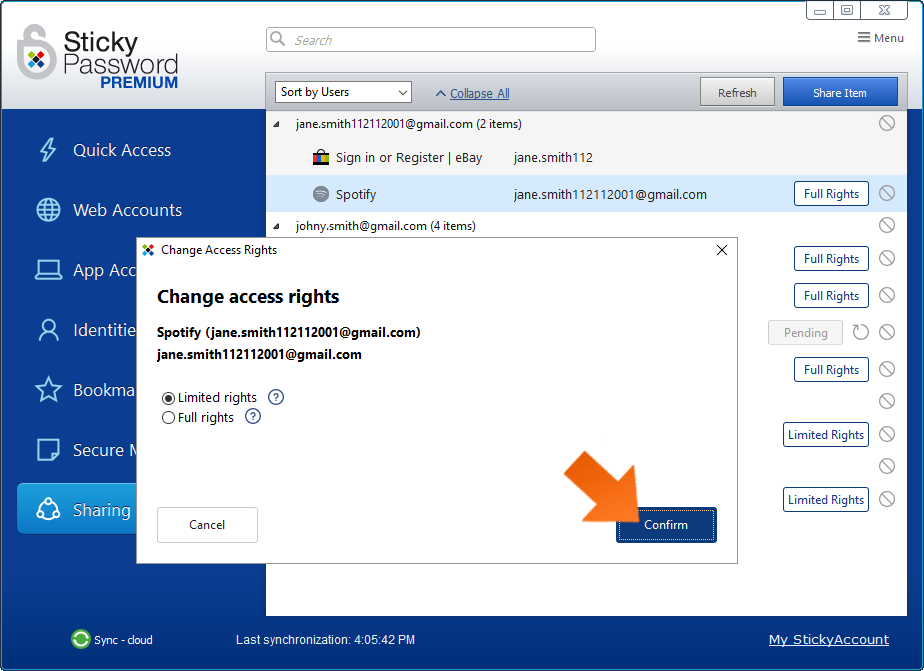
These are the items for which you can change the access rights setting. Click Full rights or Limited rights to open the Change Access Rights dialogue. Then click the radio button next to the setting you would like to use. Click Confirm.
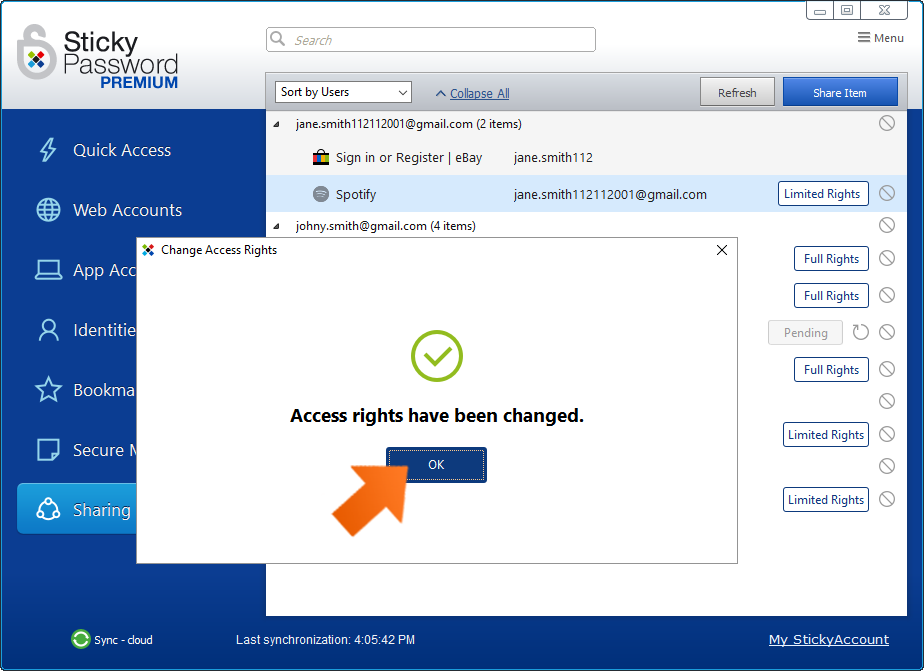
You’ll receive a popup confirming that the selected user’s access rights have been changed. Click OK to dismiss the dialog.
If you do not see the label (Full rights or Limited rights) on the right side, then this means, that you have limited rights to that item and can not change the access rights for that account.
Revoking access to a shared password
Revoking access to another user means that an item will no longer be shared with them, and they will not be able to access it. The item will be removed from their Sharing Center and Web Accounts in Sticky Password. In order to revoke the access of another user to a shared account, it is necessary for you to have full rights to the account.
You are able to:
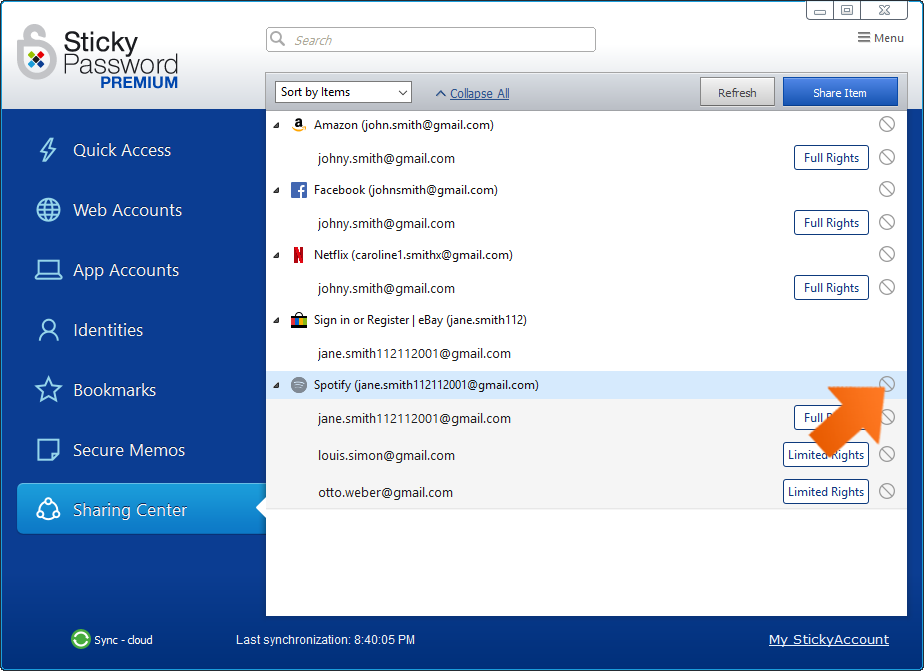
- Revoke access to all users sharing an account. To revoke access to all users sharing that account, click the No symbol to the right of the account name.
- Revoke access to a single user sharing an account. To revoke access to an individual user, click the No symbol to the right of that user’s name.
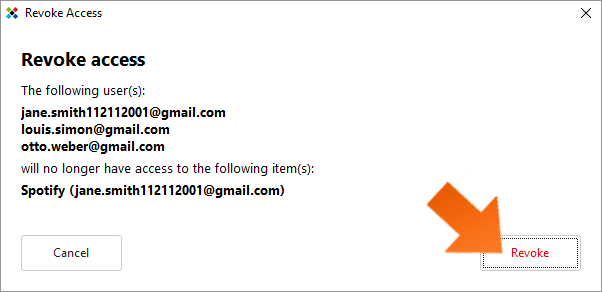
You’ll receive a popup prompting you to confirm that you want to revoke access rights to the selected item. Click Revoke to continue.
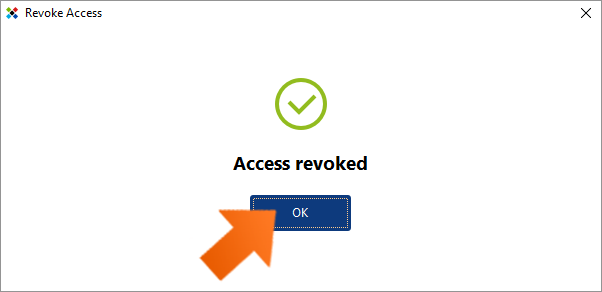
You’ll receive a popup confirming that access to the account has been revoked for the selected user(s). Note that the revoked user is no longer listed in the list of accounts.
Click OK to dismiss the dialog.
What happens when I change a shared password?
Whenever a shared login or password is changed, this change is synced to every user who has access to that shared item (both, users with full access as well as users with limited access to that item).
Note: Only changes to the login and password fields are synced to all recipients of that shared item. Changes to the URL address and name of the account are NOT synced.
How secure is the sharing feature?
Our sharing feature leverages RSA encryption technology with 2048-bit key length to protect data (logins and passwords) exchanged among users. Each participant in sharing has their own unique public-private key pair created automatically by the Sticky Password application, where the private key is encrypted by the Master Password.
When a login and password are being shared, the sender’s Sticky Password application encrypts the data locally with the recipient's public key before it is sent over the internet via our secure servers to the recipient. This ensures that this item can only be decrypted with the recipient's private key locally on their device(s). This guarantees that no-one, including Sticky Password staff, infrastructure administrators, or anyone other than the sender and the recipient(s) have access to the securely shared logins and passwords.
In addition, any data transmission channels over the Internet (between the physical device and the server side) are secured by HTTPS using the TLS 1.1 protocol and higher, 256 bit encryption. Server side transmissions are verified by high assurance SSL GeoTrust certificates.
How can we improve the answer?
Send feedbackThank you!
Thank you! We will do our best to make this answer better.
An error has occurred. We apologize for the inconvenience. Please try again.